


Why Formstack?

What is Formstack?
Formstack is a secure workplace productivity platform built to produce ingenious solutions to the everyday work that slows your organization down. From eliminating paper forms to breaking digital silos, Formstack empowers anyone to quickly and easily build custom forms, create documents, and collect eSignatures—all without any specialized skills or coding.

What is Formstack Forms?
Formstack Forms gives you:
- An easy-to-use, Section 508 compliant form building tool to collect and manage data
- Online forms that can be easily embedded directly into your website for quick lead capture
- Access to submitted data, which can be exported, analyzed, encrypted, and rerouted
- Dozens of integrations that can turn your basic form into a lead-collecting, social-media-sharing, email-marketing-capable machine
How can you use Formstack Forms at your university?
- Admission applications
- Student satisfaction surveys
- Scholarship applications
- Alumni donation pledges
- Work-study applications
And many more! Formstack has a number of education form templates available for you to use.
Formstack for higher education saves you the hassle of sorting and analyzing hundreds of paper submissions. We offer several pre-built form templates for beginning users—no coding knowledge required. All you have to do is enter some basic information, and Formstack Forms will build the form for you!

Popular Ways Higher Ed Uses Formstack Forms
In an age of social media, mobile apps, and email, it’s become more difficult for universities to hold the attention of their students. To avoid messages ending up in the trash bin, higher education employees are coming up with creative ways to use Formstack Forms to reach their most important customer.
Formstack’s versatile form builder allows users to create online forms that meet a variety of user needs. With different options such as pre-built forms or customizable blank forms, even the least tech-savvy users on your team can navigate a Formstack Forms account.

Here are some ways you can use our forms to collect and store higher education data:
- Event registrations – Is your campus hosting a conference? Do you want to plan a prospective student visit day? Attendees can fill out an online form, and their registration will be automatically entered into your submissions database.
- Surveys – Go digital with your student satisfaction or feedback surveys. Formstack Forms comes with links that can easily be embedded into an email or status update.
- Enrollment/admission – Save a tree and use a form that prospective students can fill out when applying for admission. With our multi-page feature, applicants won’t get overwhelmed by multiple questions on one long form.
- Lead generation/Request more information – Prospective students who aren’t ready to apply can submit a form requesting more information. Once they submit the form, you can use their data to mail them all of those fancy materials that make your college look so great.
- Instructor/course evaluations – Student evaluations are essential for improving the quality of your university’s education. Instead of sticking paper evaluations in a manila folder, students can submit their evaluations via a Formstack form. We offer multiple security features so you can control who sees data submissions.
- Award nominations – Everyone likes to be recognized for their hard work. Develop an awards form where users can nominate university community members.
- Internal department communication – Are you having trouble coordinating schedules for a departmental meeting? Need to take lunch orders? What about phone messages? Use Formstack Forms for a multitude of internal communication needs.
These are some of the more popular ways higher education institutions can apply online forms to their university operations. For other creative applications of our forms, explore our extensive library of form templates or check out how other colleges and universities, like University of Colorado Denver and University of Michigan, are working harder by working smarter.

How to Build a Form
So, you’re ready to build a form? Great! You can do this by using a pre-built template or building it from scratch. Luckily, we have walkthroughs for both.

Use a Form Template
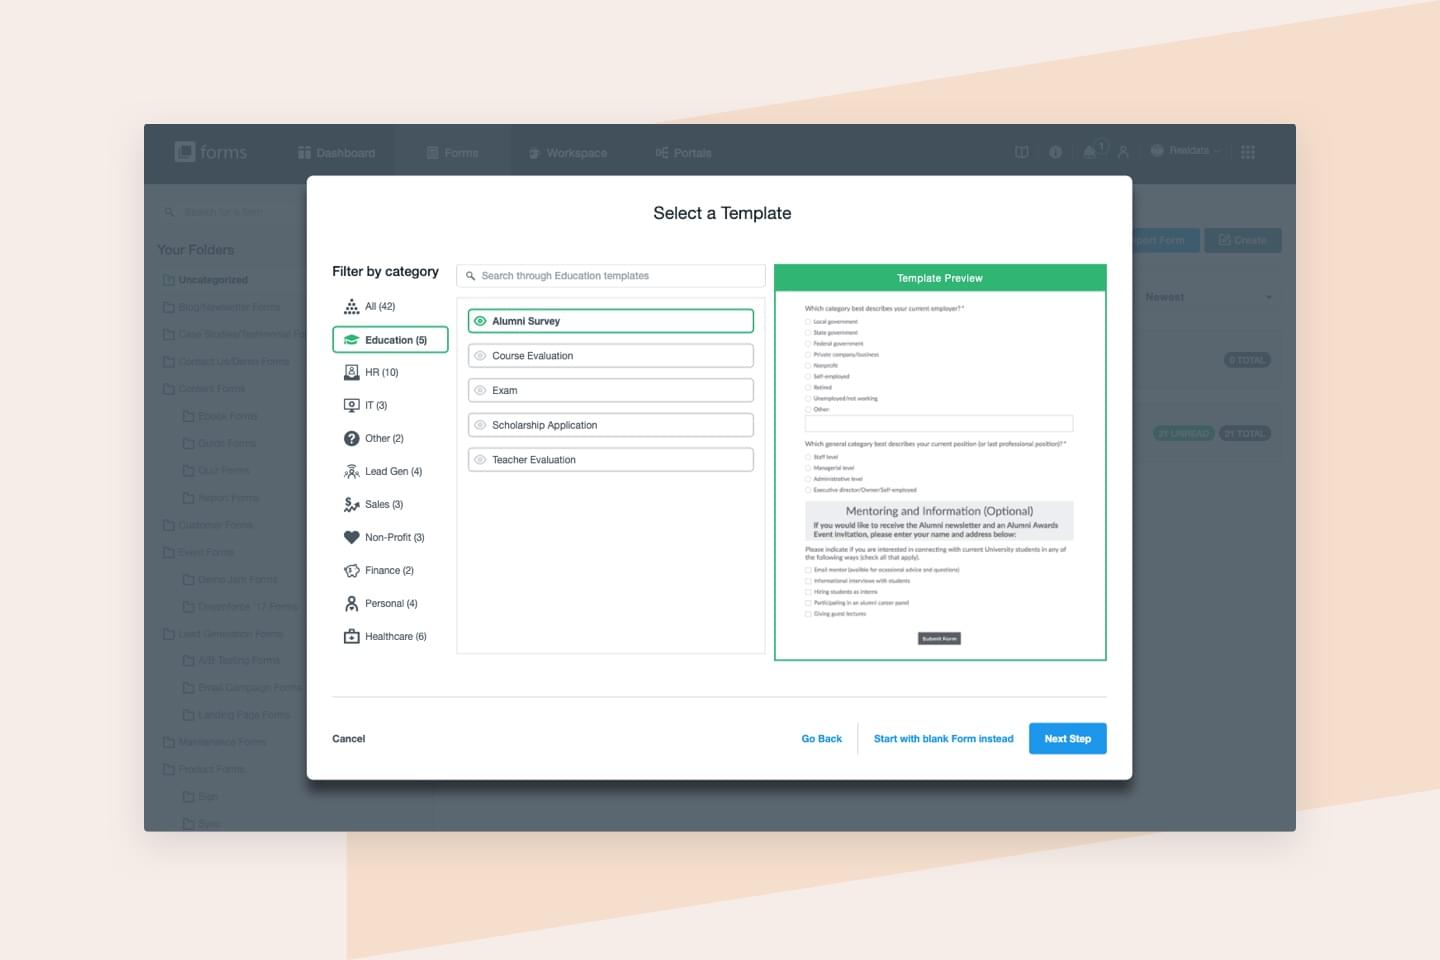
Pre-built forms are a great option for higher education users because they provide the most popular forms for the industry in just a few clicks. Check out these steps to create what you need using a form template:
- Click the Forms tab. Select “Create” on the top right-hand side.
- Select “Form,” name it, and give it an appropriate URL. Then, select “Start with a Template.”
- Select the Education category filter (or explore others!) on the left side to choose from: Alumni survey, Course evaluation, Exam, Scholarship application, or Teacher evaluation.
- After clicking “Next,” choose a theme for your form, and select “Finish.”
Now you can add fields by selecting from the menu on the left, or remove/modify sections as you wish by hovering over a field and choosing from:
- Field Properties - Change field settings to add Conditional Logic, rename selections, or access other advanced options.
- Duplicate - Create a copy of the field.
- Delete - Remove the field.
- Reorder - Click and hold to drag the field to another place on the form.
After each change you make, your form is automatically saved.
Once the form fields and sections are to your liking, you can view your finished form by selecting from the "View Live Form" dropdown menu. Start promoting and using your form by clicking the Share tab at the top right of the form. Copy the form link, embed JavaScript, post on social media, or plug into your CMS.
You’re done! Now watch as new submissions start to pour in.
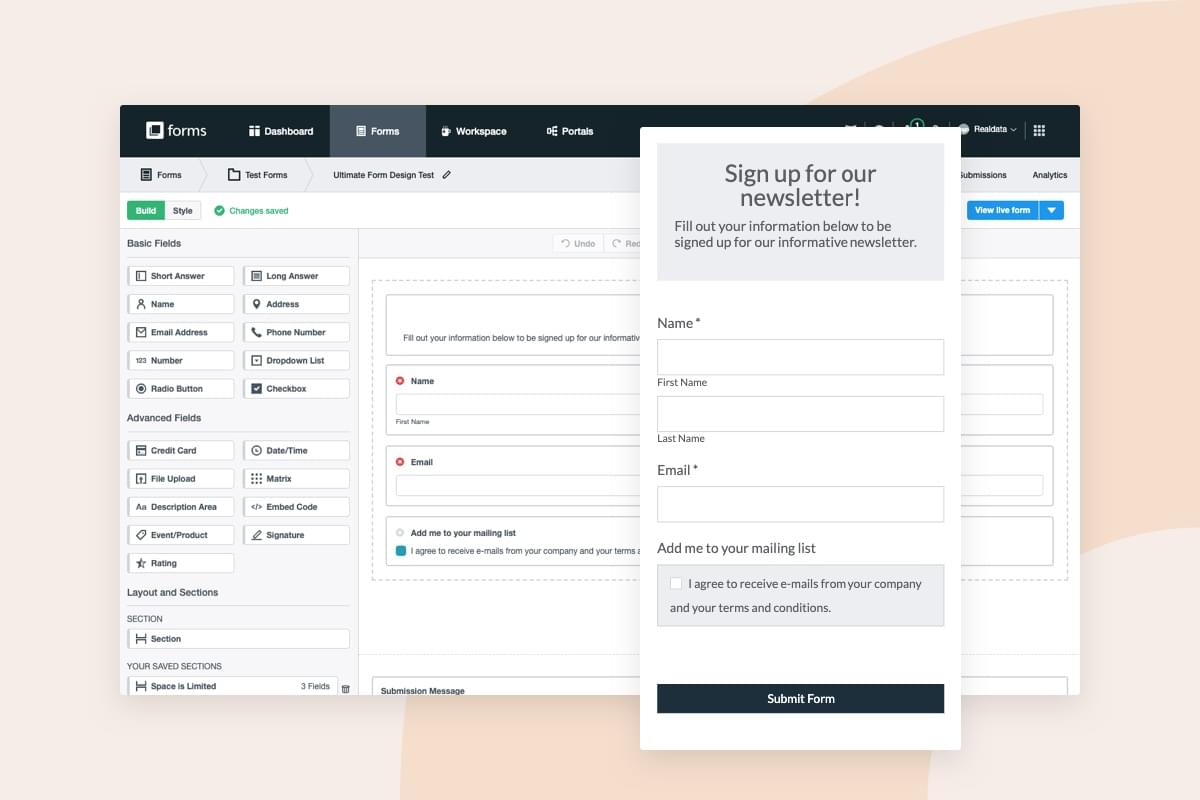
Build Your Form from Scratch
Do you feel like just diving in and building your form from the ground up? Fortunately, Formstack Forms is designed to make the form-building process as simple as possible, no matter what route you choose to do it through.
- Click the Forms tab. Select “Create” on the top right-hand side.
- Select “Form,” name it, and give it an appropriate URL. Then, select “Start with blank Form instead.”
- Start dragging and dropping appropriate fields to build your form.
Add sections as you wish. Remove/modify sections by hovering over a field and choosing from:
- Field Properties - Change field settings to add Conditional Logic, rename selections, or access other advanced options.
- Duplicate - Create a copy of the field.
- Delete - Remove the field.
- Reorder - Click and hold to drag the field to another place on the form.
After each change you make, your form is automatically saved.
Once the form fields and sections are to your liking, you can view your finished form by selecting from the "View Live Form" dropdown menu. Start promoting and using your form by clicking the Share tab at the top right of the form. Copy the form link, embed JavaScript, post on social media, or plug into your CMS.
You built a form from scratch!

Time to Get Specific
You’ve mastered the basics of building a form from scratch. Now it’s time to get into some of the fancy form-building tools that take your organization to the next level.
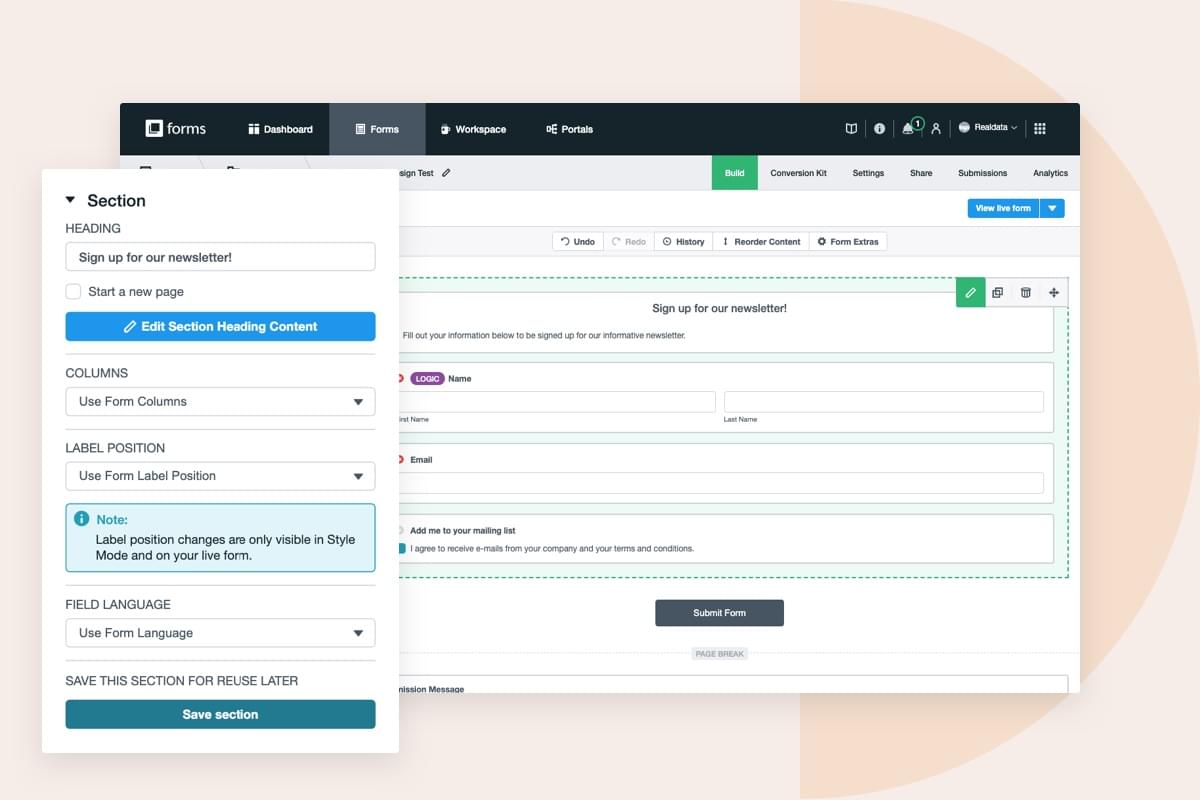
Sections
Sections are used to:
- Add explanatory text or headings to a set of fields.
- Create a new page on a multi-page form.
- Change the layout on some fields without changing the layout of the entire form.
Sections are created the same way as fields. You can drag and drop them onto your form in order to create a new section.
Sections are also edited, copied, deleted, or moved the same way as fields—hover your mouse over the section and click on one of the icons to perform the appropriate action.
There are several layout options on Sections. Sections are used to divide forms into multiple pages and to create multi-column forms. You can also set the label position for the fields inside of a section to the top or left.
Building Multi-Column Forms
By default, Formstack forms take up one column. However, you can still change this:
- Select "Form Extras" at the top of the form builder, and choose the number of columns you want your form to have from the "Columns" dropdown. You can have anywhere from one to four columns on your form, but not more than that.
- If you want part of your form to have three columns and part of it to have four columns, add a new Section to your form (leave it blank if you don’t want users to actually see it), and choose the number of columns for that section from the dropdown "Columns" menu.
Creating Calculations
Self-calculating form fields are handy for order forms or anywhere that you might need to compute a value based on what users select on your form. To create a calculating form field using separate values:
- First, create a Short Answer or Number field, then look for the "Calculation" button underneath the "Default Value" area.
- Click on the "Calculation" dropdown list to select “Use Numeric Calculation” or “Use Date Calculation.” A section called “Default Value (Calculation)” will appear below it.
- Select the field from the dropdown menu and default value, which will both appear in the text box.
When using Dropdown Lists, Checkboxes, and Radio Buttons, you can check the box that says “Use separate values” in the Advanced Options Editor. This allows you to add a number or text value to each option in the field. This can be used in many different ways, but here is one example:
You want to create an order form where mail orders are charged $5 in shipping and pickup orders are free. You could add a Radio Button field called “Shipping” to your form with two options: mail and pickup. Click on the checkbox that says “Use separate values” and assign a number value to each option (i.e., $5 for mail and $0 for pickup). When you insert this field into a calculation, it will insert $5 into the calculation when the user chooses mail and $0 into the calculation when the user chooses pickup.
Note: You will see an error when using option values that are the same, such as setting two different items as both being $5. This is because option values must be unique. To get around this, you can set one item to $5, one to $5.0, one to $5.00, etc. While these are all technically the same number, the form builder sees them as unique values and will allow you to use them.
Date/Time Fields
Date/Time fields can now be used in the creation of calculations! Learn more about creating this type of calculation here.
Multi-Page Forms
Multiple pages are useful for breaking up long forms and can be created using Sections.
- Drag and drop a new section onto your form where you want your page break, and check the “Start a new page” option in the left-hand menu.
- To enable a progress bar that shows users how much of the form they have filled out, click on the "Form Extras" button at the top of the form builder and select “Progress Indicator” at the bottom. You must have more than one page on your form to enable this function.
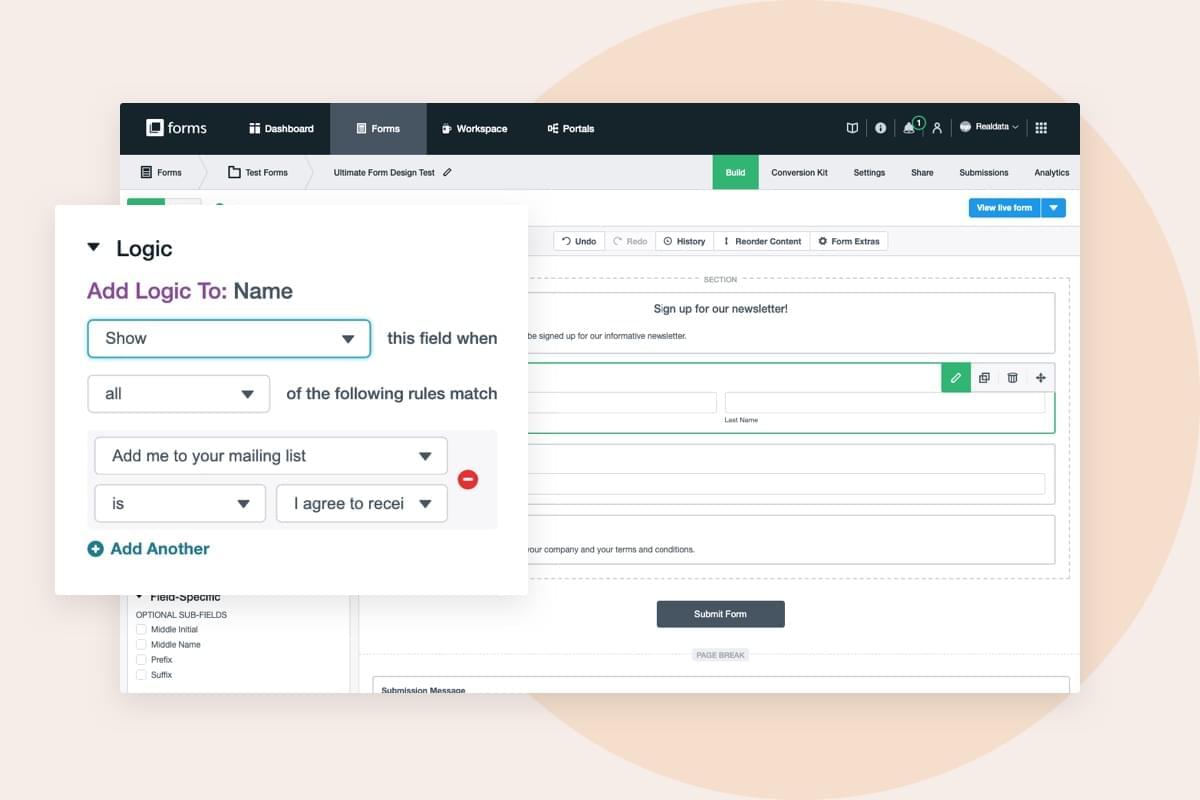
Conditional Logic
Conditional Logic allows you to show or hide a field or entire section based on what users select for another field on a form. For example, you might have a field asking users “How would you rate the textbook used for COMM 3200?” If a user selects “Poor,” you might want to display a comments field to ask the user why they thought the textbook was a poor choice.
To use Conditional Logic:
- Add the appropriate fields to your form, including a field with options (like a Radio Button field) and a field that you want to show or hide based on the choice made in the previous field.
- Select the field you want to show or hide, and click the "Logic" button in the top left corner of the builder to dive into your form's Conditional Logic settings.
- Select when and under what circumstances you would like the field or section to show on the form. After you're done, the field will show up with a distinguished background in the builder.
Note: Your form must contain a field with options or a number field in order for you to use Conditional Logic. You will need to create a Dropdown List, Checkbox, Number, or Radio Button field.
Learn more about setting up Conditional Logic.
Field Directory
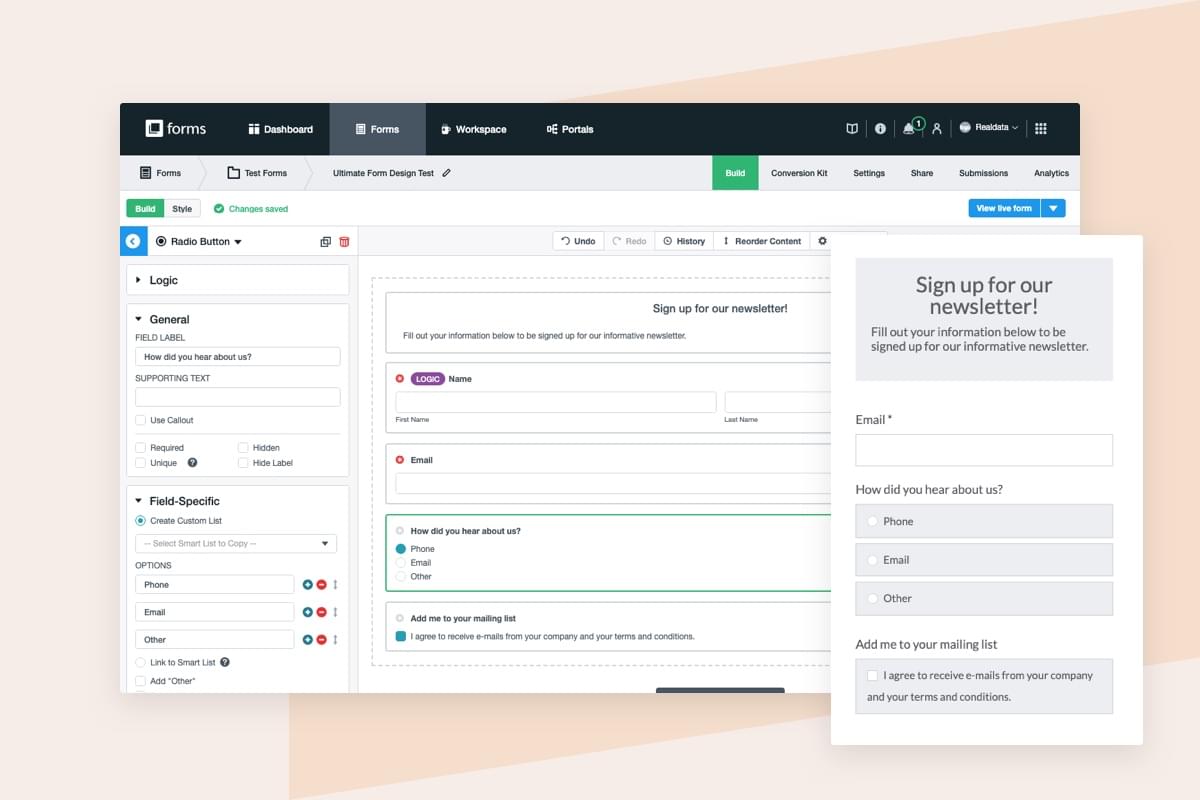
Formstack offers a number of different field types, including:
Basic Fields
- Short Answer - intended for simple single-line responses like first name, company name, favorite band, and so on. Short Answer fields can also be used to do calculations.
- Long Answer - for multi-line responses and large amounts of text, such as comment boxes
- Name - for collecting a person’s entire name in one field.
- Address - lets you collect all the parts of an address (street, city, state, zip, etc.) in a single field
- Email Address - looks and acts the same as a Short Answer field, except users must enter a valid email address when filling out the form
- Phone Number - used to collect phone numbers and validate that the proper format has been used for the phone number
- Number - validate that a number has been entered and do not allow non-numeric characters to be typed in
- Dropdown List - used to create a list of items that you want a user to choose from. You can either use a predefined list (such as State, Age, Days of the Week, etc.) or create your own list from scratch.
- Radio Button - used for fields that have several options, but you only want users to be able to select one of those options
- Checkbox - used when you have several options on a field and want to give users the ability to select one or more of those options
Advanced Fields
- Credit Card - Check to make sure that the credit card numbers typed into a form are properly formatted. If they aren’t, the form will not allow the user to hit the submit button.
- Date/Time - for date and/or time selection. You cannot base calculations on Date/Time fields.
- File Upload - used to provide users the ability to attach files to their form submissions, such as photos, PDFs, or other documents
- Matrix - a rating or Likert scale field, which you can use in surveys and other forms where you want to allow your users to rate multiple items in a single field
- Description Area - allow you to insert rich text (photos, formatted text, links, etc.) into your form
- Embed Code - embed code from other websites to include videos, maps, and other widgets you want inserted in your form
- Event/Product - allow you to organize and set up events or products based on price or available quantities and adjust the handling after the availability has been depleted
- Signature - allow end-users to sign your form, either with their mouse or finger on an iPad/smartphone
- Rating - Collect customer feedback, evaluate the success of an event, or calculate a net promoter score (NPS).

Completing Your Form
Congrats! You’ve built your form. Preview your live form by clicking “View Live Form” at the top right of the builder. Then, start distributing the form using the links in the Share tab. To change form settings (including General, Emails & Actions, Security, etc.), click the Settings tab and select from the menu on the left.
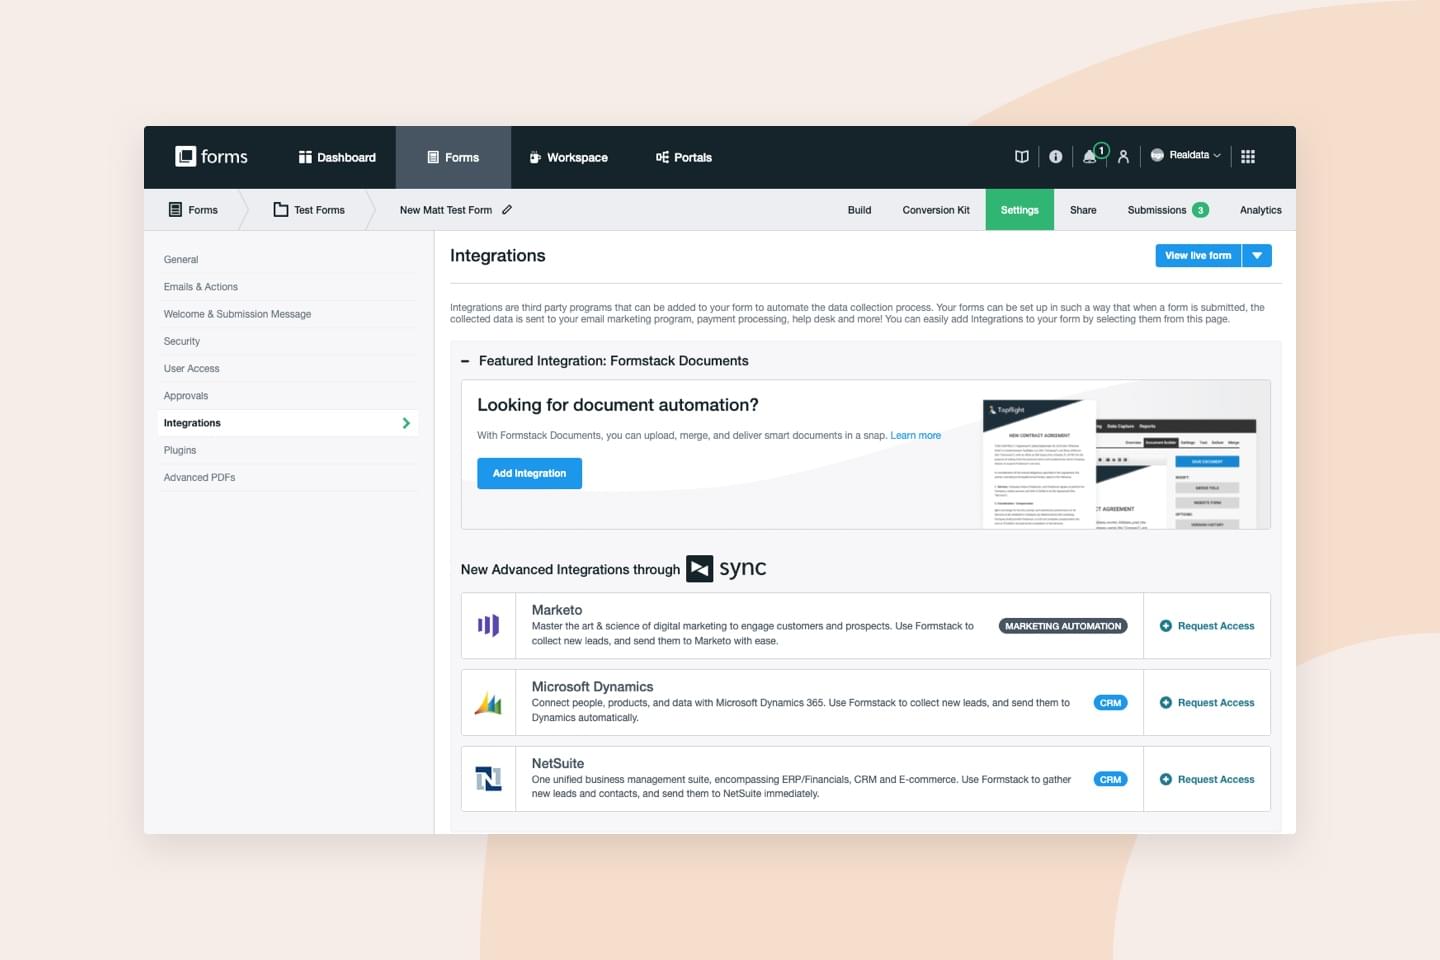
How to Set Up an Integration
We offer dozens of third-party applications that can be applied to your form. Our integrations can assist you in your university’s email marketing efforts, collect payments, sync with social media, and do tons of other awesome, time-saving things.
To set up an integration:
- Go to the top Settings tab.
- Click on “Integrations” in the left-hand menu.
- Search for the integration you wish to use, such as “Email Service Providers” or “Payment Processors and Subscriptions.”
- Click the “Add” button next to the integration you wish to apply.
For most of these integrations, you will have to enter your current account information with the product. Please make sure you already have an account in place with the providers that ask you to log in. Additionally, for some integrations, such as the payment processors, your security settings will have to be altered to ensure the payments are protected. Learn more about this step in the “Activate Security Settings” section of this guide.
- After you have completed all of the necessary account steps for your integration, click “Save Settings.” The integration will automatically be applied to your existing form.
For more information on our amazing partners and their integrations, check out the Integrations page on the Formstack website.
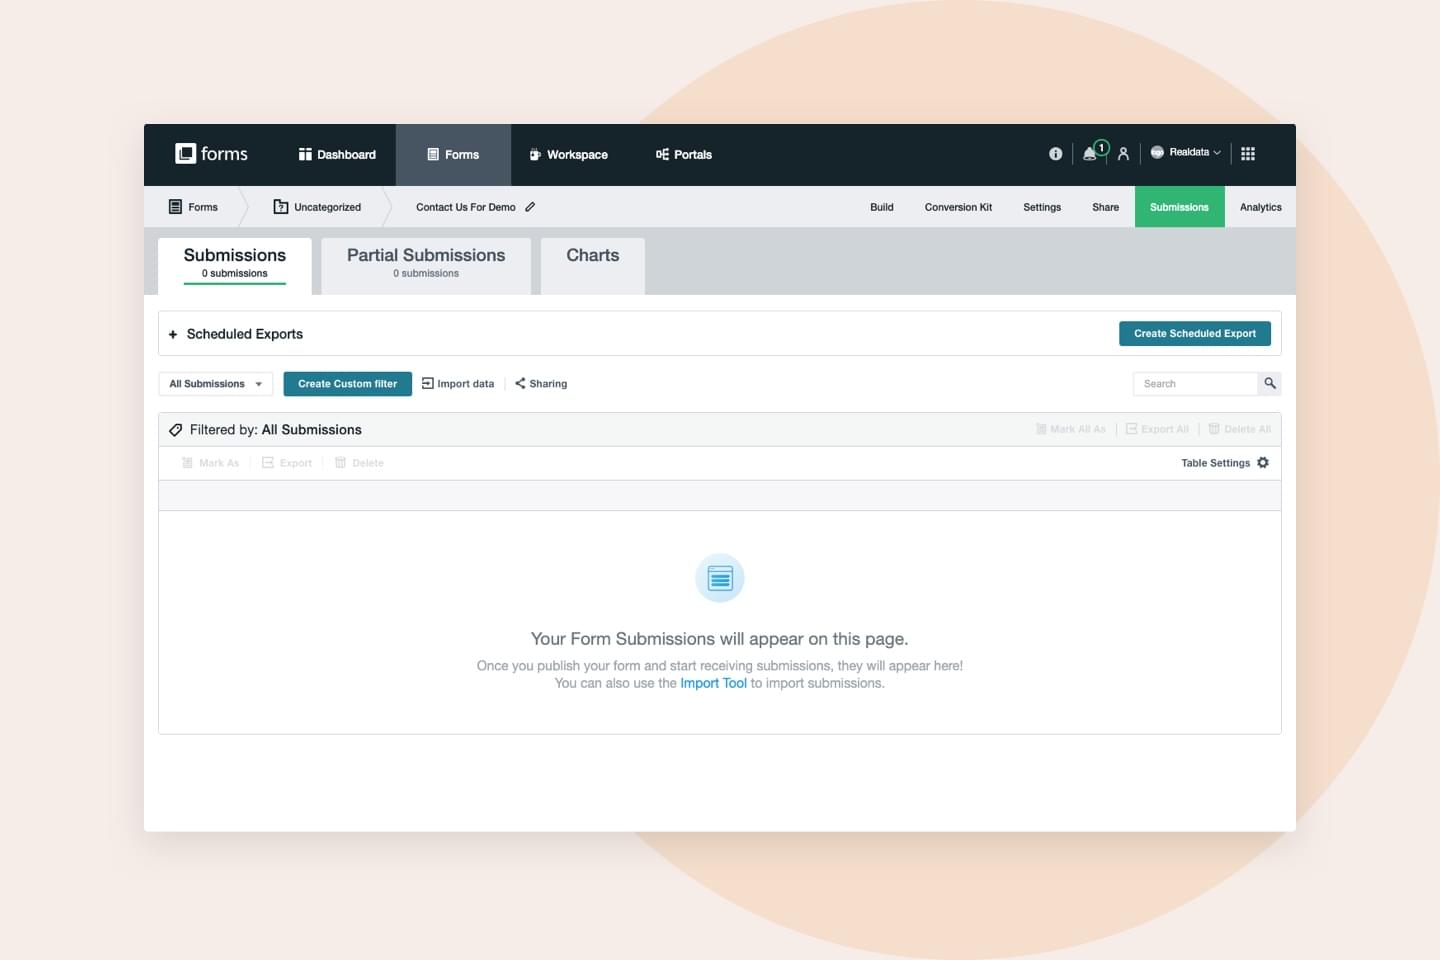
Track & Report Submissions
What good is having such cool form-building software if you can’t see what people are submitting? Fortunately, Formstack Forms account users can access all form submissions as soon as they come in, as well as create reports to analyze the data and share it with others. By default, all form submissions are saved in the database. You can turn this feature on and off on the Settings page of each form under the General tab, by choosing “Save data in the database” or “Do not save data in the database (USE WITH CAUTION).”
To view the collected data for your form, go to the form you need and click on the Submissions tab. Submissions can be deleted or edited, but be careful—deletions are permanent and cannot be undone. Make sure you avoid a college freshman housing catastrophe and double-check all form names before you delete them.
Example: Let’s say that you have all incoming students submit a form with their meal plan preferences and any dietary restrictions they might have, but you only want to pull a list of the students who have food allergies. This can easily be done with our data management capabilities. Formstack offers a powerful search function to help you quickly find specific submissions in your data. You can search a report by using the quick search box or you can click the “Advanced” button next to that box to open the advanced search window. The advanced search allows you to look for records where any (or all) of the statements you choose are true (or false) or for records that contain (or do not) contain one (or more) keywords. You can add/remove search criteria using the plus and minus buttons.
You can design reports with a wide range of parameters, such as displaying submissions during a specified time range and containing certain data points, favorite submissions, read/unread, etc.
To create a new report:
- Click on the Submissions tab on your form, and select the "Create Custom Filter" button.
- To configure your report, add a name, and start adding filters. You can add up to five filters to search your data and display only those submissions you want to see in this report.
- After you have created your report, it will be listed in your report dropdown menu. You can edit your report at any time by clicking the "Edit Filter" button. If you'd like to see all of your results in a report (which makes it easily viewable via our Charts feature), click "Columns" and then "Check all Columns."
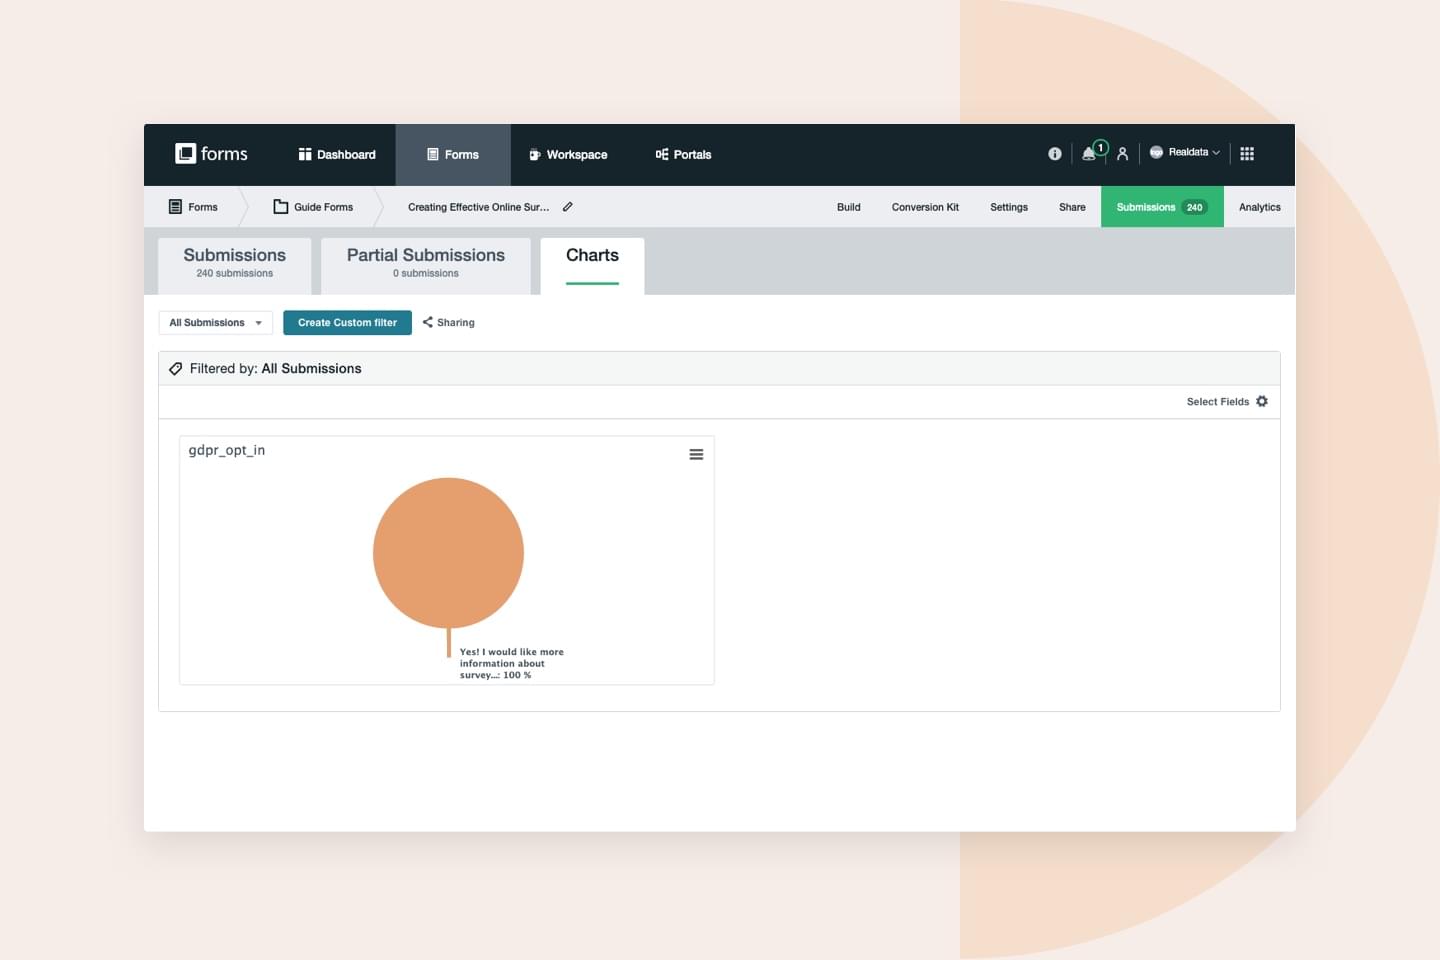
Sometimes, you’ll want to create charts to make your data more visually understandable for coworkers or students. To view your charts:
- Go to your Submissions tab and click on the "Charts" tab at the top of the table.
Note: For security purposes, the chart functions are not available on encrypted forms.
- Click on the "Select Fields" button on either the main page or the top right of the Charts report to view all the fields that have charts associated with them.
- Check the box next to each field for which you want to create a chart. Not all chart types are available for all field types. Fields that cannot be used to create charts will not show up in the list.
Charts can be viewed one or two to a line. By default, they are displayed two to a line. To change the view to one to a line, click the gear then the outward-facing arrows to expand the chart. This can make viewing charts that contain a lot of data points easier to read.
Note: You cannot set charts to always display one to a line. You must do this manually each time.
You can also easily toggle between a vertical bar graph, horizontal bar graph, or pie chart view by clicking on these icons to change the chart type. Just hover on the chart and the gear icon will appear in the lower left-hand corner.
Collect Information via Mobile
Your team (and the students you serve) are used to having information at their fingertips. That’s why we’ve built our forms to be mobile-responsive (i.e., the URL provided adapts to the size of the user’s smartphone), so users can fill them out whenever and wherever they are.
This capability could be useful for:
- Collecting submissions from students on-location: Do you need to make a list of high school seniors who checked out your table at a college fair? Want to set out an email list for alumni at a street fair? Students and their families will get tired of fumbling with paper or trying to locate a pen. Also, dozens of paper lists could easily get misplaced.
- Accessing all form submissions in real time as they come in: What if a potential student submits a question about their financial aid package? How will you respond if a frantic mother fills out a form regarding her son or daughter’s roommate placement? With Formstack, submissions can be reviewed in real time, which means you can view their information and contact them right away.
- Uploading photos and videos in one central location via a form: You might need to build a form that includes photo or video submissions, such as a scholarship application or faculty recommendation. With mobile functionality, pics and videos can be directly uploaded from your mobile device.
Leverage Social Sharing
Social media is a powerful communication tool. If you want to ensure your forms will reach students, social media is a great connecting point. All of our forms are published with a unique URL that is compatible with all mobile devices. Additionally, Formstack has two great social media features—a Twitter integration and a social sharing button for your forms—that will increase your forms’ exposure through social networking.
With Formstack’s Twitter integration, you can set a Formstack form to send out a Tweet every time you get a submission. This could be useful for a number of scenarios. If an alumnus makes a pledge to a scholarship fund, you could plan a Tweet thanking the contributor for their donation. Or, perhaps you want to send out a Tweet every time someone registers for a conference your campus is hosting.
To add the Twitter integration to your form:
- Go to your form’s Settings tab.
- Click on Integrations > Available Integrations.
- Search for Twitter and click the "Add" button.
- Click on the button that says “Sign in with Twitter.”
- Click on the button that says “Authorize App.”
Now you can create the Tweet text that will be sent out each time someone submits your form. It can include a link to the form and any fields from the form that you want to include.
The Share Buttons plugin will add Facebook, LinkedIn, and Tweet buttons to the bottom of your form, so users can share it. This is good for viral forms, such as student surveys where their participation will enter them into a contest.
To add share buttons to your form:
- Go to your form’s Settings page. Choose “Plugins” from the left side menu.
- Click the "Add" button next to the Share Buttons.
This will add a Share Buttons tab to your Settings. You can go to that tab to change the default share message users see when clicking on your share buttons.

Maintain Your Brand
Through Formstack’s unique branding tools, like our style templates and email capabilities, you can ensure that even the forms you send to participants align with your university’s brand.
Themes & CSS
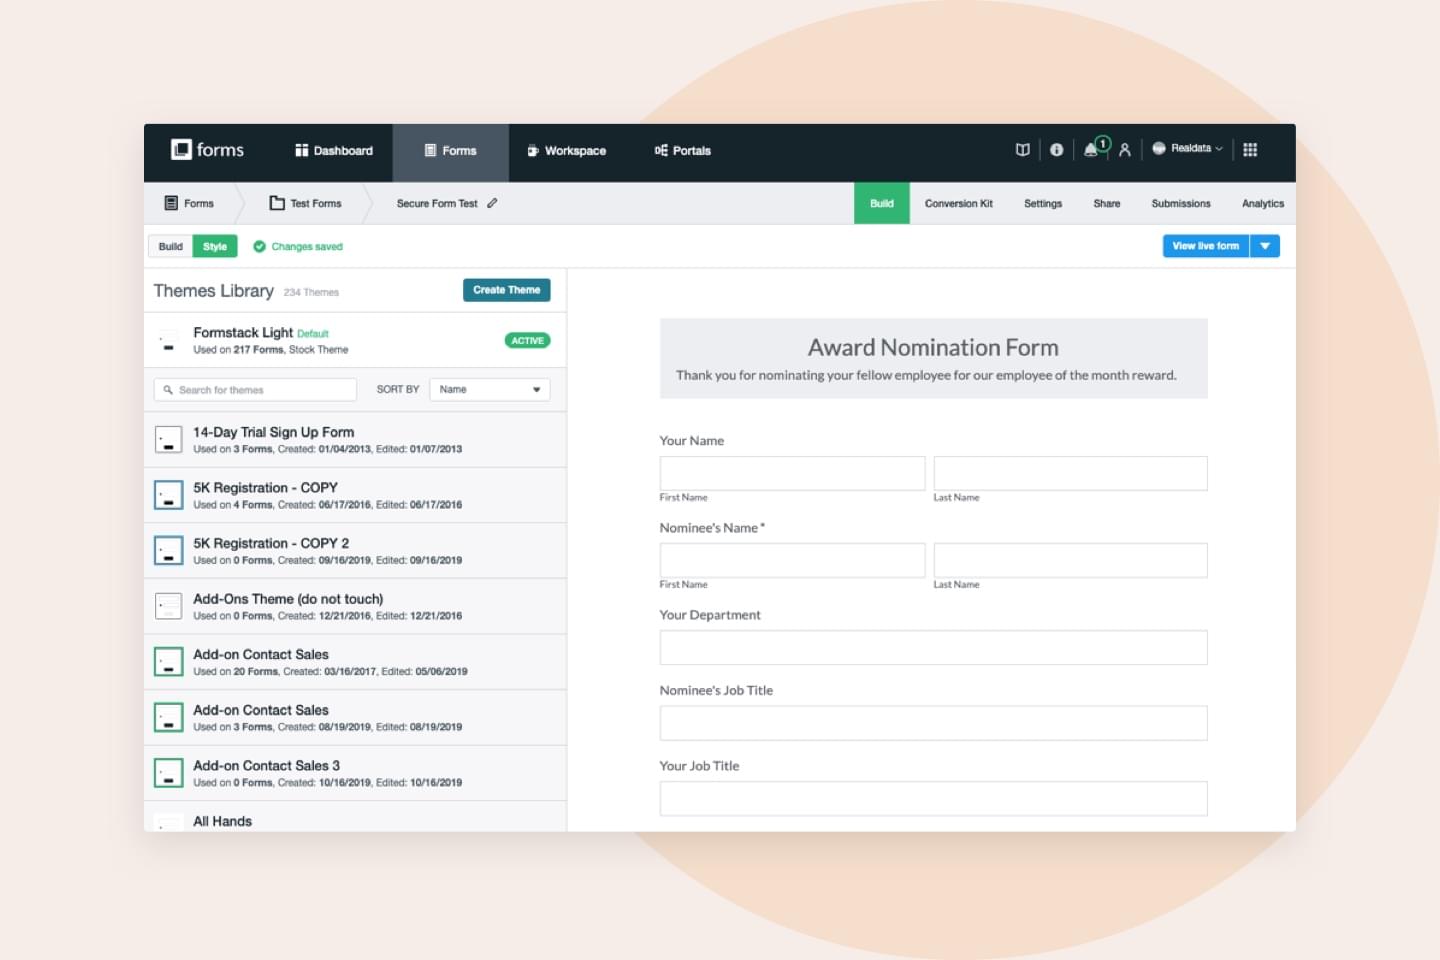
Formstack Forms allows you to choose a pre-built theme or create your own custom theme using our Theme Editor. You can even include custom HTML and CSS on a custom theme.
- On the Build page of your form, you will see the Style tab in the upper left corner. Click the Style tab to create a new theme.
- Inside the Style tab, you can search for themes in your account and also sort your themes. You'll see the active theme used on your form listed at the top. Create a new theme by selecting the "Create Theme" button.
- Start by giving your theme a name. Then begin changing the styling options for your theme. You'll see "Quick Styles" at the top, which are easy, quick edits. Open up the "Advanced Styles" tab to unleash all the theme options you can customize.
- Once you're at a good point, you may choose to Save, Save as New, or Save and Activate the theme. Save and Activate will save your new theme and set it as the active theme on your form.
One thing to keep in mind is that themes only apply to forms that are hosted by Formstack. If you're embedding a form on your own website, it will include the styling you applied to your form via your custom theme, but it will not include styling outside the form box and may be affected by the styling of the web page where you've embedded. In this case, you may need to alter the CSS on your theme. You can do this in the Advanced Code Editor inside the Theme Editor.
Note: If there are code conflicts in regards to formatting, styling, or functionality when you embed the form on your site, try using the iframe embed method.
Placing your Logo in a Form or Email
To further reinforce your university’s brand, you might want to insert your school's logo into your forms. There are two ways to add a logo to your form:
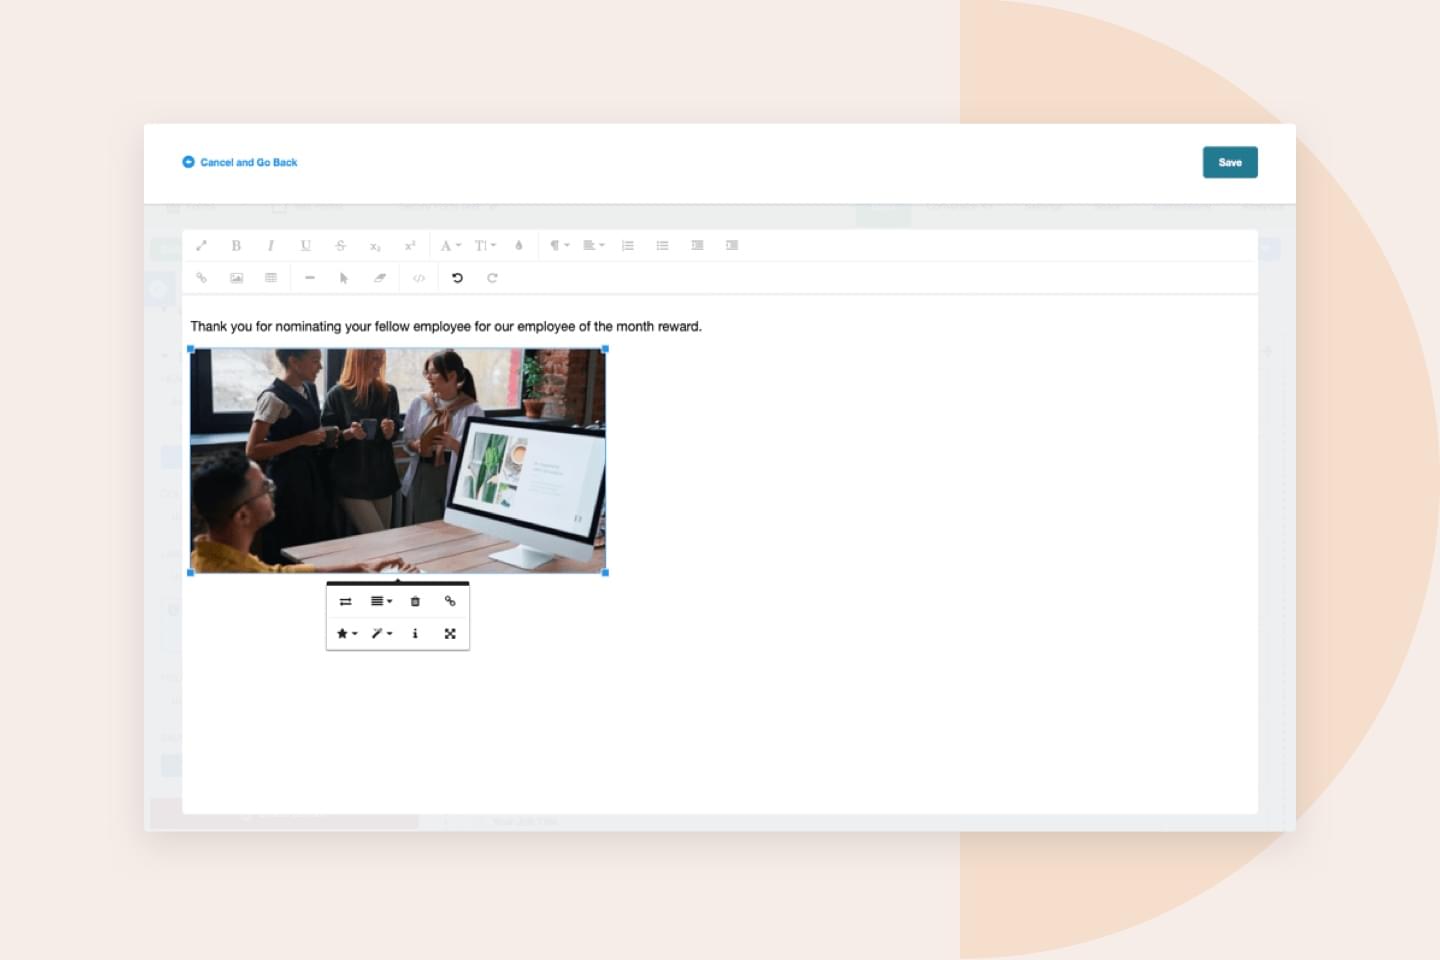
Description Field Option
You can add an image or logo directly to the top of your form through the Description Area field. The benefit of adding a logo to the Description Area field is that the logo will appear when embedding the form via the Javascript embed method.
To add an image to a Description Area field, click on the mountain icon when editing the field and select the image you'd like to upload. Place the Description Area field towards the top of the form, and you'll have a logo!
Theme Option
You can also style your form with default themes and custom themes by editing the header. Please note that header images do not display when embedding forms into websites using the javascript embed code method.
To add a header via the theme:
- Go to the Style tab in the upper left corner of the builder, hover your mouse on the active theme, and click "Edit."
- Then, go to Advanced Styles > General, and click on "Upload Image" beside Form Header to add a header to your form.
- Click on "Choose a file" to find an image on your computer, or drag and drop a file into the dotted lined square. You can then resize the image or change the alignment of the image on the form. If you want to remove the image, click the red X icon.
You can also place your logo into confirmation emails. Learn more about how to place logos in confirmation emails.
Import & Export Data
Formstack’s data storage capabilities are a huge part of what makes our product so easy to use. You can import and export your data and create reports, but you will occasionally want to give your coworkers access to the submissions you collect or put useful data into your Formstack Forms account for future reference. Here’s how you can share the love by importing/exporting data.
To import data saved in a .CSV (plain-text) file:
- Go to the Submissions tab of your form, and click on the "Import Data" button.
- Browse to the CSV file on your hard drive, and then hit the "Upload File" button. Only CSV files will work.
- You’ll now see all the columns on your CSV file. Map them to the corresponding field on your form that you want to populate with that column’s data, and hit the "Import My Data" button. Your data will then be imported into Formstack Forms.
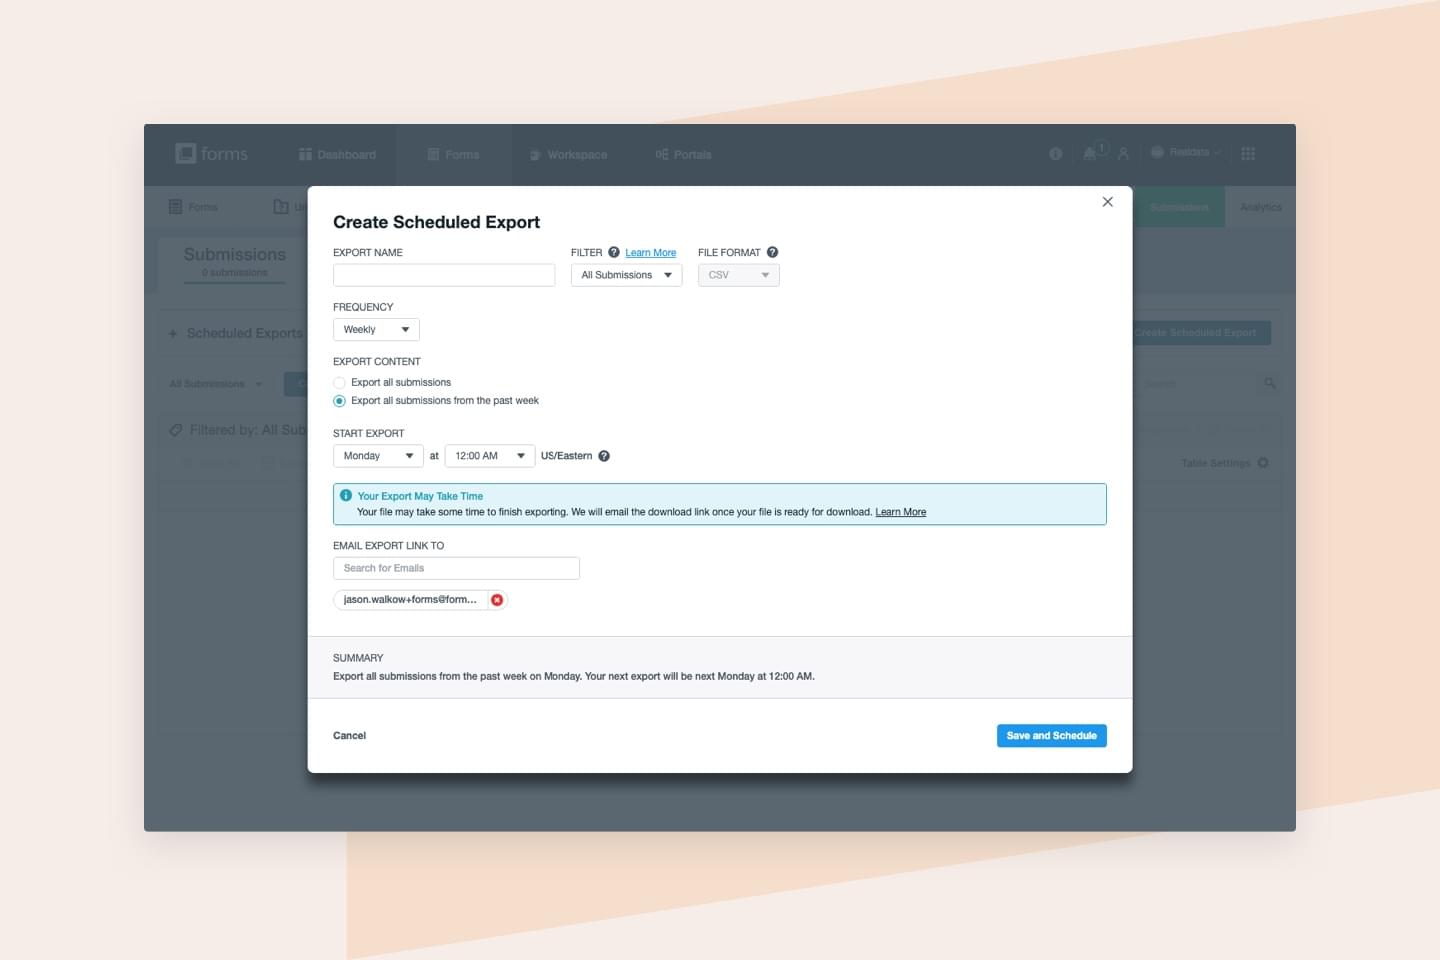
You can export all your data, all data since the last download, or a manually chosen set of data. To export just some of your submissions:
- First check off the submissions you'd like to export.
- A blue "Export" icon will display above the submissions.
- Click this to choose your export output. With this Export option, data will download immediately instead of being sent to your email.
To share All Submissions or a Filtered Report with others:
- Click on the "Share" icon in the top-center section of the report.
- You will then be prompted to choose your level of sharing. You can choose to keep sharing off (default), only Charts, Data Table and Charts, or Everything.
If you choose to only share charts, individuals will not have access to the data table or any data not displayed in the charts. The option to share only the data table and charts is a "limited sharing" option and will not allow individuals to see or access data not shown in the shared data table and charts report. To share all your existing data and charts, choose Everything.
- Once you choose your share level and click OK, click “Share Link” or “RSS Link.” The link will automatically be copied to your clipboard so you can share it with anyone you'd like to have access to your submissions, including people who aren't Formstack Forms account users.
Advanced Security Settings
In higher education, you’ll be collecting some pretty sensitive, classified data using Formstack Forms. We take the privacy of your forms and data very seriously. Your form data will never be sold or distributed to a third party, and we will never view or access your data unless you specifically request it for support reasons. Follow these steps to make sure it’s for your (or your department’s) eyes only.
In order for your form data to be fully secure (most importantly when collecting payments), it must be encrypted at four points:
- When a user submits the form. This is done by activating SSL for your form.
- When the submitted data is emailed to you. This is done by setting up PGP for your form if you receive submission data emails.
- When the submitted data is saved for later download. This is done by setting up data encryption on your form if you enabled data saving under the form settings.
- When you download the data. This is done automatically.
SSL is automatically enabled on every Formstack form.
Note: We cannot enable SSL on your website, only on the form. If you embed the form on your website, the form will be secure, but your web page will not show as secure unless you have your web host enable SSL on the page where the form is embedded.
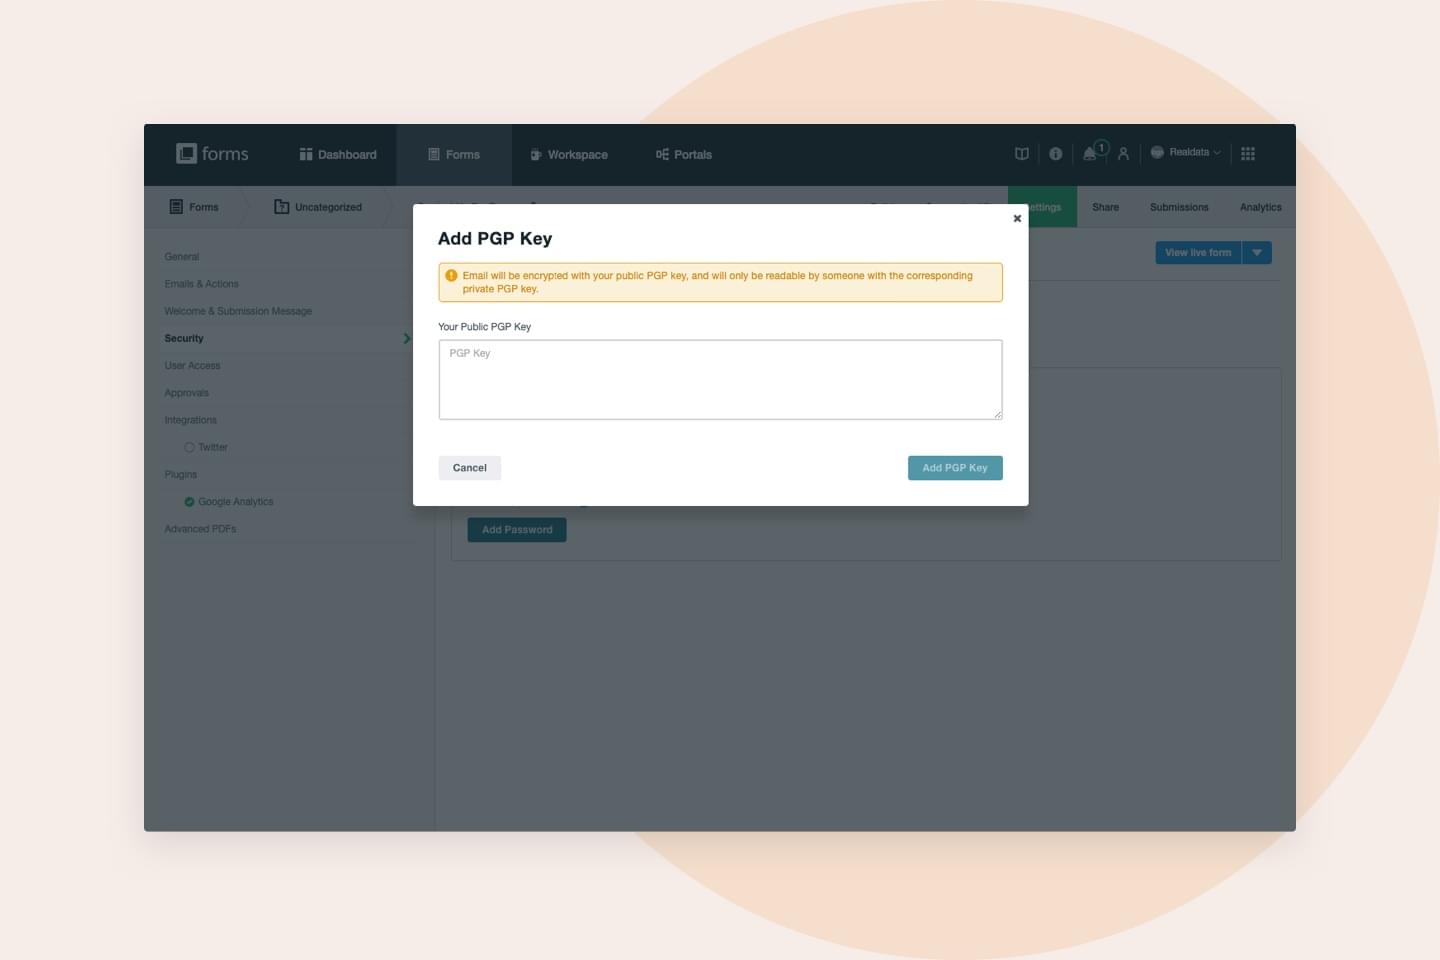
To enable PGP for your form and upload your PGP public key:
- Figure out your PGP public key. PGP support is already available for many email applications, including: Microsoft Outlook through GPGol, Mozilla Thunderbird through Enigmail, Apple Mail through MacGPG, and Microsoft Windows through Gpg4win.
- Click on the Settings tab for your form.
- Choose "Security" on the left side menu.
- Click “Add PGP Key” under the Advanced Settings box, and paste your public key into the field.
If you do not see the PGP field, your account plan does not give you access to this feature.
Note: Setting up PGP is a complicated process. An easy alternative would be to just not email sensitive data to yourself. Instead, create a custom notification email that includes all of the submitted data EXCEPT for the sensitive data such as credit card numbers. Then, log into your Formstack account to view this data when you receive submissions.
To enable data encryption on your form:
- Click on the Settings tab for your form.
- Choose "Security" on the left side menu.
- Under Advanced Settings, click “Add Password,” and enter a new password in the "Encrypt Saved Data" field. You will have to verify the password to continue.
If you do not see the data encryption option, your account plan does not give you access to those features.
Note: You do not need to enable data encryption if you are not saving collected data in the database.
Get the Best Grade in Higher Education Management
More than 1,000 colleges and universities use Formstack Forms to exceed enrollment goals, improve student engagement, and streamline higher education business processes. Our form builder gives you powerful tools to:
- Simplify data collection
- Streamline work across departments
- Eliminate paper pushing
- Keep data clean and connected

Don’t have the tools and features discussed in this free guide—but wish you did? Get started today, and make your team’s workflows hassle-free.